Installing The Modules
Installing the 3GB Kingston HyperX DDR3 2GHz memory kit is pretty simple, but we'll run you though it to make sure you get it right if you pick up one of these kits down the road. For starters we have had the best luck with stability and overclocking using the orange slots on the ASUS P6T Deluxe motherboard, so if you are installing just one kit of memory be sure to place them in the orange slots.

The Kingston KHX16000D3K3/3GX memory kit comes with XMP memory profiles, which is great for those using a Core i7 motherboard that supports these profiles. You just need to enable Intel XMP memory profiles and the BIOS will be properly configured and you'll be on your way. The ASUS P6T Deluxe motherboard doesn't have XMP settings in the BIOS, so when you fire up the system for the first time it will look like the CPU-Z screens above show. The multiplier was set to default in the BIOS, but for some reason it was showing up as 25 in CPU-Z 1.48. The memory was showing up at 1333MHz, which means that the kit was booting off one of the JEDEC profiles. This is ideal as the system will boot without caching since we have to increase the voltages to be able to reach 2GHz. In order to reach 2GHz you will have to reboot the system and enter the BIOS by hitting delete when the system is booting or by using the mouse to enter the BIOS at the ASUS Express Gate menu.
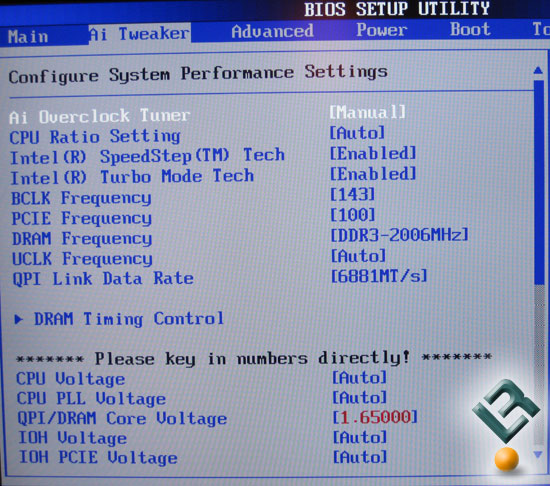
Once you get to the motherboard BIOS you need to go over to the AI Tweaker menu and all the adjustments you want to make for the memory will be located here. The first thing you want to do is enable manual overclocking. This will open up some hidden adjustments that we need to change. The first setting we need to change is the BCLK Frequency and this needs to be raised from 133MHz to 143MHz. Once this is set, lower the DRAM Frequency down one level and when you do this it should show up at DDR3-2006MHz as seen in the picture above. The last setting you have to adjust is the QPI/DRAM Core Voltage and this needs to be bumped up to 1.65V. If you want to manually set the DRAM Timings you can enter the DRAM Timing menu from this screen and manually set the timings to 9-9-9-24 1T, but that might not be needed as we tried it with 'auto' timings and it ran at CL9 timings on its own.
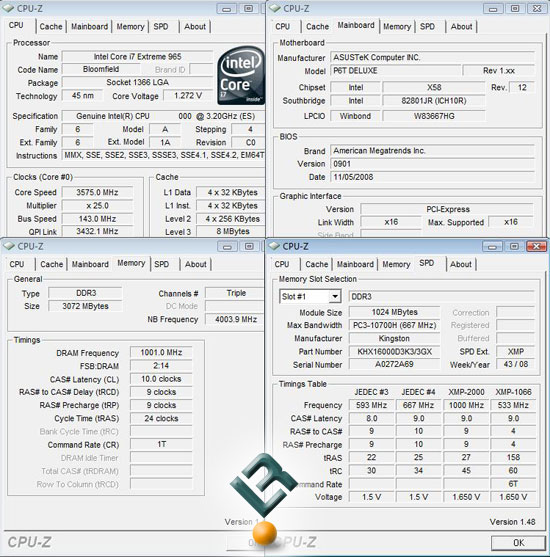
After saving the BIOS settings and loading up Windows Vista Ultimate 64-Bit, we can see that the DRAM Frequency is correct, but the CAS Latency shows up as CL10. We fired up other utilities like Lavalys Everest and it showed 9-9-9-24 timings. With 9-9-9-24 1T timings manually set in the BIOS it still showed up as CL10, so this must be another bug with a BIOS hook or in the CPU-Z utility itself.